

Want to spice up your WordPress navigation menu with some unique icons?
What if I told you that you could do that for free, without a plugin and it's not that difficult either!
What do we do?
In this article we will download a few icons to add to our navigation menu. We will upload these icons to the WordPress media library and finally we will use the icons for our WordPress menu links with a few lines of CSS.
No plugins?
I know a popular and easy way to add custom icons to your WordPress menu is to do it with the Better Font Awesome plugin.
This is a nice way to do it, but… sometimes the icon you're looking for isn't available in the Font Awesome library, or you just found a cool icon online that you'd like to show on your website, but just can't. knows how.
If you follow this step-by-step guide, you will have no problem adding your own icons.
Before we start
For this tutorial you will need one childtheme necessary. The easiest way to create a cildtheme is with a plugin, like Child Theme Generator. After you finish creating your child theme, you can immediately uninstall this plugin.
Find the icons
With all the resources available online for free icons, this step won't be a problem.
For a good user experience, choose an icon that reflects the link, so don't go too crazy or you might confuse your visitors.
Choose a small size that matches the font size of your menu. The size of my icon is 32px.
Download the icons and save them. You may want to keep the file name short and simple for further use.
Upload the icons in WordPress
In your WordPress Dashboard, go to Media in the left sidebar and choose Add New.
Browse for your files to upload them or drag them onto the rectangle.
Now you have access to your icons within WordPress.
On the right you will see the file URL ( for example http://example.com/wp-content/uploads/2023/04/house.png )
Copy and paste the link into something like Notepad, as we will use this later to reference the file in CSS.
Add a CSS class to the menu on the left
Now we need to add a class to the menu links, where we want to add a custom icon.
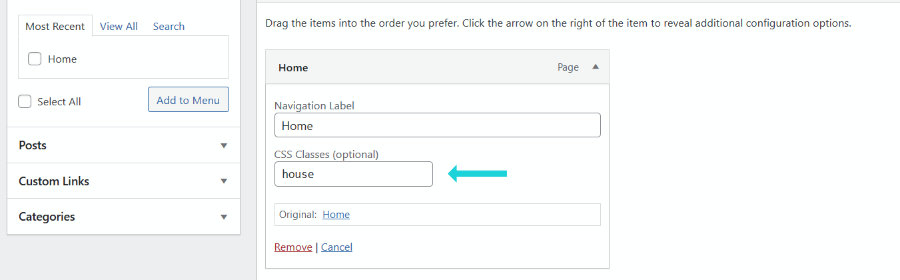
On the left side of your WordPress Dashboard, choose Appearance -> Menus. At the very top on the right is a Screen Options button. Click on it and check the CSS Classes box.

This will enable the option to add a CSS Class.
Open your menu below, click on a link, for me it is “Home” and you will see a field where you can add a CSS class. My .png file is called house.png and I want to use it for the Home link, so I add the class house to. Save the menu.
Add the CSS
This is the hardest part, the CSS. I try to keep it as simple as possible, so in this example we will perform all the steps from the WordPress Dashboard.
In the left sidebar, choose Appearance and then Theme Editor. In styles.css we add CSS to the menu class. In the example I use the class house.
This code adds an icon to the left of the menu link. Here is an example for my house.png and menu class house.
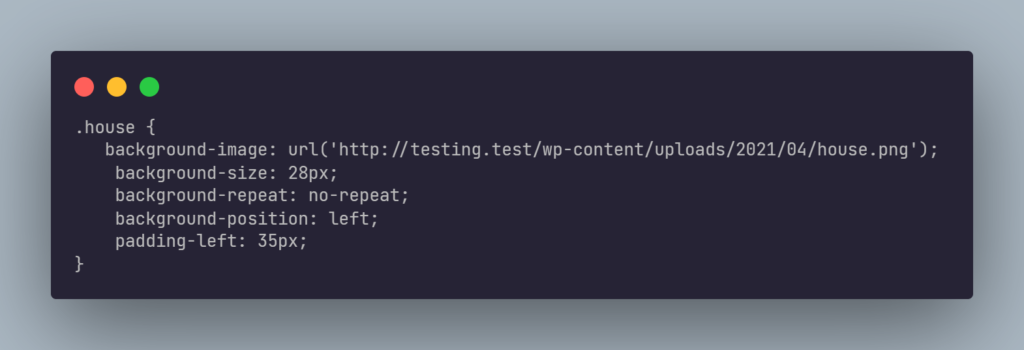
background-image: url()Paste in the URL you previously copied from the Media Library.
background-size This determines the size of your icon. Keep it below actual size to keep your icon sharp.
background-repeat This will cause the icon to be displayed only once.
background-position “Left” places the icon to the left of the menu link.
padding-left Creates a margin between the icon and the menu link. Play with it for the right results
Repeat the above steps for the other links until all menu links have a custom icon.
Finito!
And there it is, your own unique WordPress menu with your own custom icons of your choice!
I hope you have fun following this tutorial and that your menu looks great!